Despite valiant attempts by the marketing departments of Microsoft and Sun, CGI is still the most commonly used architecture for creating dynamic content on the World Wide Web. In this series of tutorials we’ll look at how to write CGI programs. This first tutorial looks at the basics of CGI programming.
This article was originally published by Linux Format in April 2001.
Please note that these tutorials are only left here for historical interest. If you are writing new web applications with Perl these days, you should be considering something based on PSGI and Plack or even something using raw PSGI.
Introduction
CGI is the “Common Gateway Interface” a very grand sounding name for something that is really very simple. It’s nothing more than a protocol that defines how a web server can interact with an executable program to produce dynamic web pages. It defines how the web server sends information to the program and how the program can send information back to the web server which the web server will, in turn, send back to the browser.
We’ll look at this in more detail soon, but first let’s ensure that we’ve got everything set up so that we can run CGI programs.
What you need for CGI programming
Firstly, you’ll need a web server installed. Just about every Linux distribution comes with a version of Apache which is by far the most common web server on the Internet. In this series of tutorials we’ll assume that you’re using Apache, but the examples should work just as well on any other web server. See the box “Getting, Installing and Configuring Apache” for more details on how to set Apache up on your system.
You’ll also need a programming language to write your programs in. You can use just about any language to write CGI programs, but the majority of people seem to use Perl. The main reason for this is Perl’s unequalled ability to manipulate text. Other advantages that Perl has include the fact that it runs on more platforms than just about any other programming language and that it has a great repository of free modules and language extensions at http://www.cpan.org. Perl also comes as a standard part of every Linux distribution, so you’ll already have it installed.
In the interests of keeping this tutorial down to a manageable size, I’m going to have to assume that you already know something about programming in Perl. If not, see the box “Learning Perl”.
Our first CGI program
Let’s write a simple CGI program in Perl. We’ll stick with tradition and write a “hello world” program. Here it is in its entirety.
|
1 2 3 4 5 |
#!/usr/bin/perl -wT use strict; print "Content-type: text/plain\n\n"; print 'Hello world'; |
Save this into a file called “hello” in your cgi-bin directory and run it by entering the URL
|
1 |
http://localhost/cgi-bin/hello |
in your browser. You should see the the text “Hello world” in the browser. If not, read the boxout section on debugging CGI programs to get help tracking down the problem.
It’s not a very complex program at all. There are only a couple of things that distinguish it from a standard Perl program that you’d run from the command line. The first of these is the -T option on the shebang line. This puts Perl into “taint mode”. In this mode Perl will automatically distrust any data that comes from the user and won’t let you pass that data to the operating system until you have untainted it. We’ll see why taint mode is a good idea and how to untaint data in next month’s article, but in the meantime it’s just a good habit to get into.
The second difference is the addition of the line that prints the content type header. This is our first brush with the CGI protocol. All CGI programs should output a set of headers which the web server will pass back to the user’s browser. In most cases the only header that we will need to return is the content type header. This tells the browser what kind of data the program is sending. In our example we returned plain text, so the content type was “text/plain”. More usually we’ll return HTML, so the content type will be “text/html”. There’s no reason why your program couldn’t return more complex data, for example, PNG (“image/png”). The set of headers should be separated from the actual data with a blank line. This is achieved by printing two newline characters after the final (or, in this case, only) header.
Also notice that the program writes its output to STDOUT. The web server will have arranged to capture any data written to STDOUT and to pass it back to the browser.
A (slightly) more complex example
Our previous example really didn’t do very much at all. There’s no need to have a CGI program which just displays fixed text. That could just as easily be done with an HTML page. Let’s write something which has dynamic output. Here’s a script that prints the current time.
|
1 2 3 4 5 6 |
#!/usr/bin/perl -wT use strict; print "Content-type: text/plain\n\n"; my $now = localtime; print "The time is $now"; |
This script works on exactly the same principle as the last one, but we get the system time using the Perl function “localtime” and print that value. Each time you reload the script the time will be updated.
Once again this script is outputting plain text. Let’s see a version that returns HTML.
|
1 2 3 4 5 6 7 8 9 10 11 12 13 14 15 16 17 |
#!/usr/bin/perl -wT use strict; print "Content-type: text/html\n\n"; my $now = localtime; print <<END_HTML; <html> <head> <title>Time</title> </head> <body> <h1>Time</h1> <p>The time is $now</p> </body> </html> END_HTML |
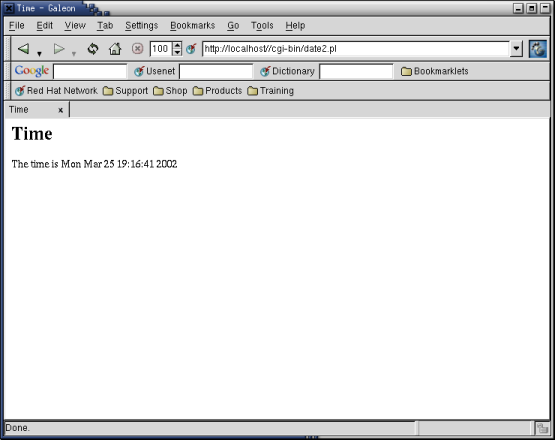
This program looks a little more complex, but really it’s doing exactly the same thing as the previous example. The added complexity comes purely from the fact that we have to display a complete HTML page. Also note that we have changed the content type to reflect the fact that we are now returning HTML. The browser will recognise the content type and will convert the HTML into a web page. Here is the output from this script.
Some people think that it looks untidy having all of that HTML in your Perl program. In the standard Perl library there is a module called CGI.pm which allows you to “hide” all the HTML generation behind function calls. Here is the same script using CGI.pm.
|
1 2 3 4 5 6 7 8 9 10 11 |
#!/usr/bin/perl -wT use strict; use CGI ':standard'; print header; my $now = localtime; print start_html(-title=>'Time'), h1('Time'), p("The time is $now"), end_html; |
We’ve made a few changes to the script. The most important one is to add the “use CGI” line. This loads the CGI.pm module and asks Perl to import a standard set of functions from that module into our program. We then use five of these functions to display the page. The “header” function produces the content type header. The default content type that it returns is “text/html”, but you can pass it a parameter to return other types. “start_html” returns the standard block of HTML that always begins an HTML page. Notice that it takes an optional argument which defines the contents of the <title> tag. “h1” and “p” create headers and paragraphs and “end_html” prints the final </html> tag.
It doesn’t really matter whether or not you use these HTML functions in your CGI programs. If you’re more comfortable putting the raw HTML into your code then feel free to do so. You should still use CGI.pm however, as it has other features which we’ll see very soon.
Getting input – HTML Forms
The previous section told you just about all that you need to know about displaying output from CGI programs. The other side of the equation is getting input into the program. To talk about this, we need to take a slight detour and look at HTML forms.
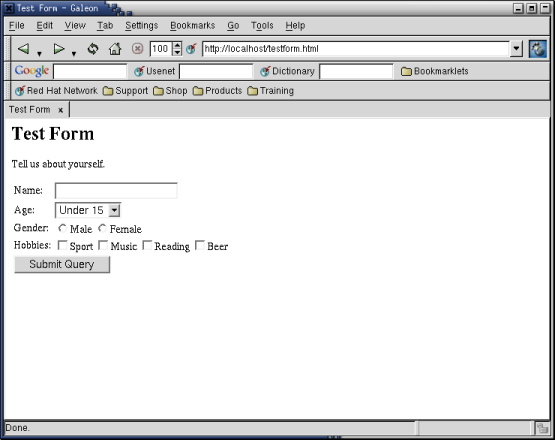
HTML defines a number of input widgets which you can use to pass user data to a CGI program. This is much the same set of widgets that you’ll be familiar with from any GUI application – text fields, radio buttons, checkboxes, pop-down menus and many others. Here is a very simple form that makes use of a number of these widgets.
|
1 2 3 4 5 6 7 8 9 10 11 12 13 14 15 16 17 18 19 20 21 22 23 24 25 26 27 28 29 30 31 32 33 34 35 36 37 38 39 40 41 42 43 44 45 46 47 48 |
<html> <head> <title>Test Form</title> </head> <body> <h1>Test Form</h1> <p>Tell us about yourself.</p> <form action="/cgi-bin/form.pl" method="get"> <table> <tr> <td>Name:</td> <td><input type="text" name="name"><td> </tr> <tr> <td>Age:</td> <td><select name="age" size="1"> <option>Under 15</option> <option>15 - 25</option> <option>26 - 35</option> <option>36 - 45</option> <option>Over 45</option> </select></td> </tr> <tr> <td>Gender:</td> <td><input type="radio" name="gender" value="Male">Male <input type="radio" name="gender" value="Female">Female</td> </tr> <tr> <td>Hobbies:</td> <td><input type="checkbox" name="hobby" value="Sport">Sport <input type="checkbox" name="hobby" value="Music">Music <input type="checkbox" name="hobby" value="Reading">Reading <input type="checkbox" name="hobby" value="Beer">Beer</td> </tr> <tr> <td colspan="2"><input type="submit"></td> </tr> </table> </form> </body> </html> |
This form contains a text input (for the name), a drop-down list (for the age), a pair of radio buttons (for the gender) and a set of checkboxes (for the list of hobbies. Most importantly it also has a button to submit the data to the web server. This is how the form looks in a browser.
Notice that each of the form input elements in the HTML page have a name attribute. This will be important when we come to access the data. Also notice that the input elements are within a <form> tag and that one of the attributes of the <form> tag is called “action”. This attribute defines the CGI program that will be called when the form is submitted.
Here’s the script that processes the form data
|
1 2 3 4 5 6 7 8 9 10 11 12 13 14 15 16 17 18 19 20 21 22 23 24 25 26 27 28 29 30 31 |
#!/usr/bin/perl -Tw use strict; use CGI ':standard'; my $name = param('name'); my $age = param('age'); my $gender = param('gender'); my @hobbies = param('hobby'); my $list; if (@hobbies) { $list = join ', ', @hobbies; } else { $list = 'None'; } print header, start_html(-title=>$name), h1("Welcome $name"), p('Here are your details:'), table(Tr(td('Name:'), td($name)), Tr(td('Age:'), td($age)), Tr(td('Gender:'), td($gender)), Tr(td('Hobbies:'), td($list))), end_html; |
Once again we’ve used CGI.pm to produce the HTML, but we’ve also used the same module to get our input. CGI.pm has a function called “param” which returns information about the data that has been passed to the script. Called without any parameters, “param” will return a list of all of the parameter names and when given the name of a parameter it will return the value associated with that name.
The CGI parameter names are the names of the input elements on the HTML form. For example the “name” parameter returns the text that was typed into the text box called “name” and the “age” parameter returns whichever of the options in the “age” drop down menu was selected.
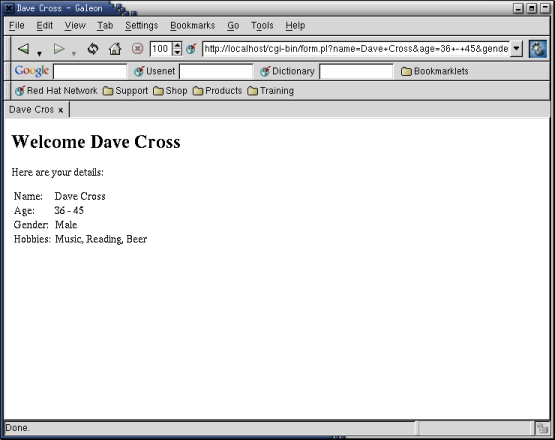
When you submit the form you’ll get back a page like the one show here. If you look in the location box of the browser you’ll see that the URL has changed. It has the names and values of the CGI parameters appended to the URL of the program. The URL looks like this:
|
1 |
http://hostname/path/to/program?name1=value1&name2=value2&name3=value2 |
You can also see that any spaces in the names and values have been converted to “+” signs. Other punctuation marks would be converted to a “%” sign followed by the ASCII code for the character in hexadecimal. For example an “@” character would be represented as “%25” (25 hex is 37 decimal which is the ASCII code for “@”). This is known as URL-encoding. The piece of the URL containing the parameters (the part following the “?” character) is called the query string.
Before CGI.pm was included in the standard Perl library (over five years ago) Every CGI program had to do all the work to extract the CGI parameters from the query string. They would get the query string, split it into name/value pairs and undo all of the URL-encoding. It was a lot of code that was included in every CGI program. You’ll still see code that does it in CGI scripts of dubious quality today. These days CGI.pm handles all of that behind the scenes so we no longer have to worry about it.
In our script, we get the values of each of the parameters in turn and assign them to variables. We then print out the values of these variables in an HTML page. This script also demonstrates how to use some more of the HTML functions from CGI.pm – in this case the “table”, “Tr” and “td” functions that are used to create HTML tables. All HTML tags have a corresponding function in CGI.pm. Notice the the function for creating a <tr> tag is called “Tr” rather than “tr”. This is because Perl already has a built-in operator called “tr”.
One parameter is handled slightly differently to the others. In our form we had a series of checkboxes all of which had the name “hobby”. If you look at the query string, you’ll see how this is handled. The query string contains a sequence like this
|
1 |
hobby=Music&hobby=Reading&hobby=Beer |
There’s a “hobby=” section for each checkbox that was selected. If you look at the code for this program you’ll see how we deal with this. Instead of assigning this parameter to a scalar, we assign it to an array. If you have a multi-valued parameter like this, the “param” function will return a list of values. We can then examine the array to see how many hobbies were chosen and substitute a suitable value if none were selected.
Conclusion
So in very simple terms, that’s about all there is to know about writing CGI programs. You get your input using “param”, do some processing, and then send some output (starting with a content type header) to STDOUT.
Next month we’ll write some more complex examples and look at some of the security issues that you need to consider when letting people run CGI programs on your web server.
Getting, Installing and Configuring Apache
If you don’t already have Apache installed you can get the source code from http://httpd.apache.org/. Different Linux distributions put the various parts of Apache in different directories, but if you build your own copy from the source code you’ll find that the default installation puts everything you need under /usr/local/apache. This directory will contain a number of subdirectories. For our purposes, we’ll only need to look at five of them:
- bin – this is where the Apache program (called httpd) is found together with other various utility programs.
- cgi-bin – this is where you’ll put your CGI programs. It will already contain a few sample CGI programs.
- conf – this contains the configuration files for Apache.
- htdocs – this is the root for your web site. All of your HTML files will go underneath this directory.
- logs – this is where the log files are found. It’s much easily to debug CGI programs if you have access to the error log.
Starting Apache
If Apache was installed as part of your standard Linux installation then it will almost certainly also be configured to start automatically when Linux starts up. You can see if it’s running by typing
|
1 |
$ ps -e | grep httpd |
at your command line. If Apache is running you’ll see a number of httpd processes running. If it isn’t running you’ll need to start it yourself. There’s a program called apachectl in the bin directory. Simply run
|
1 |
$ apachectl start |
and you should see a message saying that the server has started. You can also run
|
1 |
$ apachectl stop |
to stop the server and
|
1 |
$ apachectl restart |
to stop and immediately restart the server. This last option is useful when you’ve changed the server configuration.
Having started your Apache server we can check that it’s working properly. Simply start up your favourite browser and type
|
1 |
http://localhost |
in the location box. You should see the Apache web server default page. If not, you’ll need to investigate a bit further to find out what the problem is.
Assuming that Apache is working correctly, the next step is to check that it is configured to run CGI programs correctly. We’ll try to run one of the Apache sample CGI scripts. The URL is
|
1 |
http://localhost/cgi-bin/printenv |
If your server is configured correctly you’ll see a list of environment variables displayed in your browser. If not, it’s time to start looking at the Apache configuration file. The file is called http.conf and it’s in the conf directory under the main Apache directory. Search this file for a line like
|
1 |
ScriptAlias /cgi-bin/ "/usr/local/apache/cgi-bin/" |
This defines which directory will be your cgi-bin. Ensure that the directory path is correct and tha the line isn’t commented out. Having made the relevant changes, you’ll need to restart Apache as described above.
Learning Perl
Here are some suggestions of some places to go to get information on Perl.
The best book for learning Perl is called “Learning Perl” and is by Randal Schwartz and Tom Phoenix. It’s also know as the Llama book because it has a llama on the cover. The Llama is good is you already have experience of programming in another language. If you’ve never programmed before then you’ll be better off reading Andrew Johnson’s “Elements of Programming with Perl” or Simon Cozen’s “Beginning Perl”.
The definitive Perl reference book is “Programming Perl” by Larry Wall, Tom Christiansen and Jon Orwant. This has a camel on the cover so it’s also known as the Camel book. Other Perl books worth reading include “The Perl Cookbook” by Tom Christansen and Nathan Torkington and “Effective Perl Programming” by Joseph Hall with Randal Schwartz.
For more details about CGI programming with Perl I recommend “CGI Programming with Perl” by Scott Guelich, Shishir Gundavaram and Gunther Birznieks, “Writing CGI Applications with Perl” by Kevin Meltzer and Brent Michalski and “The Official Guide to Programming with CGI.pm” by Lincoln Stein.
There are a number of good web sites where you can get information about Perl. The main Perl site is at http://www.perl.com. There’s a site for Perl beginners at http://learn.perl.org and the best place to get help and advice on Perl problems is a site called Perl Monks at http://www.perlmonks.org.
Perl users’ groups are called “Perl Mongers”. To see if there is a group near you go to http://www.pm.org.
And of course, there’s a Perl tutorial column every month in Linux Format which is written by Charlie Stross.
Debugging CGI programs
Obviously not every CGI program that you write is going to work first time. But because the web server is involved, people often find it a bit tricky to debug CGI programs. Here are a few tips.
1. Check syntax first
A number of errors can be caught by checking the syntax of the program from the command line. If you type
|
1 |
$ perl -cT script_name.pl |
at your command line, Perl will check the syntax of “script_name.pl” and report on any errors it finds.
2. Check logic
Another good reason for using CGI.pm is that it knows when your script is being run from the command line and it fakes a CGI environment for your script to run in. For example, running
|
1 |
$ script_name.pl "name1=val1&name2=val2" |
will run “script_name.pl” putting “name1=val1&name2=val2” into the query string. This allows you to check the behaviour of your script under a number of different inputs. You can even run a CGI script through Perl’s built-in debugger by running
|
1 |
perl -Td script_name.pl "name1=val1&name2=val2" |
3. Check error logs
I mentioned earlier that Apache’s log files are stored in the logs directory. When you’re debugging a CGI program the most important log file is called “error_log”. When there is an error in your program, Apache will display an uninformative “500 – Server Error” message to the user, but will write the real error message into the error log. This is where you’ll find more detail on exactly what went wrong.
4. Use CGI::Carp
Apache displays the nondescript “500 – Server Error” page for a reason. Telling just anyone what errors your programs are generating is a security risk. Only the webmaster needs to know the details of the errors and he can always read the error logs. However, when you’re developing a program it’s handy to get full error messages in the browser. The Perl standard library contains a module called CGI::Carp which can do just that. Simply add the line
|
1 |
use CGI::Carp ':fatalsToBrowser'; |
to your program and any fatal errors will appear in you browser as well as in the error log. This makes it easier to debug the program. When you’ve finished development, change the line to
|
1 |
use CGI::Carp; |
and the errors will no longer go to the browser, but the messages in the error log will be nicely formatted and timestamped.
